
Hey all! Okay, so I know that I promised you all an ATC tutorial when we last met, and I'm not one to break my promises. At least I try my very best not to. :) So anyways, I'm here with some ATC's. No lie. So here's the deal. Some of these steps may seem pointless, worthless, or meaningless. And I almost guarantee that at least one of them will seem that way. But when it actually comes down to it, and you dig out all your supplies in order to try and make SOME sense of this tutorial, you'll thank me. ;)
So first off I'd like to start with a basic definition of an ATC. An ATC is a miniature piece of art. Otherwise knows as Artist Trading Cards. Thus the acronym. So basically what you do with them is to take your medium and work with it on a miniature "canvas", which is 2.5"x3.5." An ATC can be worked in many, many, MANY different mediums, so you never can be quite sure what you'll receive back when you participate in a swap. Some people collage, some paint in watercolors, some in acrylics. Some draw theirs, and some even embroider (a medium that I have yet to try in ATC form :O) theirs. For my example I'm going to show you a collaged one. (For the time at least)

Okay. To start off, you need to collect your supplies. I collect a vast variety of supplies, pulling anything and everything that could possibly match the idea I have forming in my head. That's another thing to note. When I'm working on an ATC, I normally have a basic idea in my head, though it is only in the VERY beginning stages. Don't be intimidated by my large pile of supplies (otherwise known as arty crap); I won't use them all, only a few of the actual things in the pile shown will be used.
I'm more of the out of sight, out of mind type. So having all of my possible supplies out in front of me (even for something as small as an ATC) is very helpful. Notice that I have various images, stamps, papers, inks, punch outs and punches, trims, tapes, embellishments, and paints sitting out in front of me. I'm telling you, it totally helps.

A closer shot of the various papers I was trying to choose from. I had a piece of a magazine image, a paint chip, several specialty papers, and some pages from an old book. These show the variety that can be used. For a tutorial, I should have also included some cardstocks, but unfortunately they didn't quite match the vision I had in mind for this particular card. Also, don't be afraid to choose and pull several papers. Or even try out several for the same image. The thing with this kind of art is, that if it doesn't work, just use it on something else. :P I'm telling you; my method's foolproof.

The next step is to cut your paper into 2.5x3.5" rectangles. When you are cutting and measuring for this step, make sure that they stay pretty true to the initial measurements. When you're just getting started it doesn't matter that much, as you're probably not going to be trading your first cards, but when you get started trading they need to be pretty precise. Some people even think that if the measurement varies too far from the right proportions, then they cease being ATCs!! So be careful. One more note on this picture; as you can see, this is actually a perfect example of the tip I mentioned in the last paragraph in action. I couldn't decide between the specialty or the text paper for my image, so I cut one of each and tried out the image on both. It gives me a better visual. Also, the one that you decide not to use can always be used for your next card. :P

I decided on the specialty paper. It just seemed to work right with my image. After looking at it for a moment, I decided that it seemed a little plain, so I jazzed it up a bit with a cursive background stamp. You can see that the bottom stamping defiantly isn't perfect, but you won't be able to notice in the finished card.

Next up on the list; paint! I love paint for all of my projects, so when you mention collage ATCs, that's sort of the first thing that comes to mind. Don't ask me why, it just does. When I looked at what I had already decided, I thought that a more monochromatic type scheme would work best for this project, so I found a nice metallic bronze. You can't really see here, but it's actually a bit sparkly and shiny in real life.
Also, instead of using a paint brush to spread my paint like a "normal" person would, I use an old credit/gift card. They're sturdy and fun to use and they sort of resemble a pallet knife when they're used. Plus, as an added bonus, I don't have to clean any brushes; I just let the paint dry on the card! I'm a lazy bum when it comes to art, I admit it, but I don't really care...

This is what the card looks like after being spread with metallic paint. I told you it resembles a pallet knife!! And can you see the sneak peek of my image there in the corner?

Now for the stamping. I like to add at least a bit of stamping to each of my cards and art journal pages. Actually, anything that uses even a bit of collage automatically needs some stamping. Sometimes I use rubber or acrylic stamps with ink pads, but this time I thought the card was calling for something drastic. I used a large (and I mean LARGE) spiral foam stamp with black acrylic paint. It gave me just the look I was going for!! If you want another tip for stamping, here's one for you; when stamping on anything (art journal pages, inchies, ATCs, scrapbook pages, etc) always stamp at least SOME of the images off of the edge of the paper. It gives it a nice cohesive effect.

Next, I went over the entire card with a layer of distress ink. A tip for using this stuff is to NOT apply it evenly. I know that it goes against everything you've ever learned about crafting. Ever. But trust me. It really works, and just adds to the distressed effect that's so popular recently. Now that I think about it, I should really do a distress ink tutorial/technique examples post. Hmmm...

Next I placed my image on the card. Isn't the owl so cute?! Anyways, you see how the tip of the owl's tail has a streak of black on it? Or how the sentiment has a streak of metallic brown running through it? That was an accident. Purely mistake. But unlike some other people, who may have tried to cover it up, or even reprinted the entire thing, I just went with the flow. It's the same way as when I'm working with an art journal page. Almost every single time I sit down to create, another color gets mixed into the white background. Instead of getting upset, and either trying to cover it up or flipping to a new page, I just use it as a prompt! For example, if a bit of green gets scraped onto my page since it was left over on my pallet, I simply make a green page! Great inspiration.
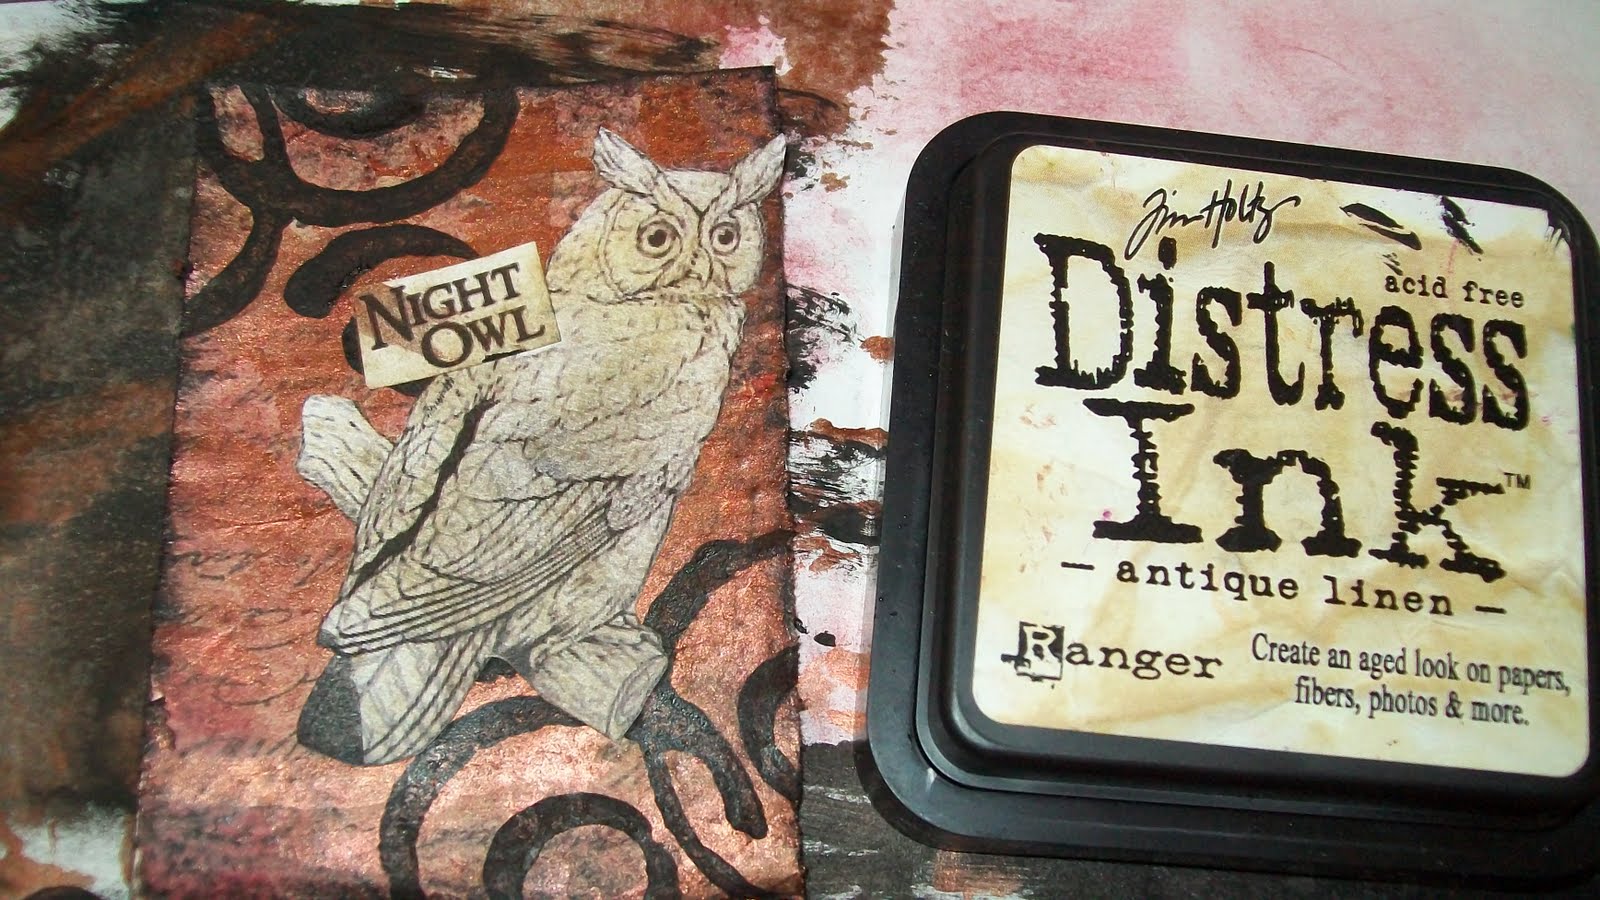
Okay, anyways, back to the card. I thought that the above owl was looking a little bit white for the card, and it felt like it stood out too much. So, I went over it with an small amount of antique linen distress ink. I love this stuff and I'm proud!! :D

So anyways, here's the finished card. I just added the small piece of black electrical tape in the lower left hand corner and spotted it with white stickles (which is a professional glitter glue which has much more sparkle than regular glitter glue. Though I'm not really a sparkly/glitter person, when I do want bling, I want it to sparkle!)
So that's about it!! I know that the post was long, and maybe a bit annoying to read the whole thing, but I hope that I at least helped somebody with this. I know that I had fun writing it! Enjoy!
I enjoyed your tutorial. It is interesting to see how other people make their Atc's. I love making them although I havent made many this year. I do have one small problem with the name of these cards artist TRADING cards. My ex partner did try to explain to me that they are meant for trading. But I used to like what i made and didnt want to part with them. Lol I love your journal. Truly inspirational. Thanks for sharing
ReplyDeleteHugs julie
Hi! First, I wanted to say THANK YOU for posting this "for dummies" tutorial. I am becoming interested in ATCs and other kinds of art, but just have no idea about techniques, and am scared witless. So this very simple step-by-step process is actually incredibly welcome in my book...
ReplyDelete2 questions: what did you adhere the owl with? And did you put any sort of Mod Podge or sealer/protectant over this?
THANK YOU again!
Hello Sassy Kitten! In answer to your question, I adhered the owl simply with a regular tape runner that is most commonly used for scrapbooking. The adhesive is very strong and holds well. And also, on this particular card I did NOT use a sealer. If I would have used excesive ammounts of glitter, then I probably would have, but I find that it normally work well enough to simply ise plenty of glue or adhesive. Hoped this helps!!
ReplyDelete